It does not matter weather you have cut-the-cable entirely, are a part-time streamer, or hide in the back-bedroom during the holidays to get your Hulu fix, everyone wants to watch hot contents during the holidays! For me and my family, the second installment in The Hunger Games film series, The Hunger Games: Catching Fire is a holiday must. So let's start with watching The Hunger Games (2) Blu-ray through Apple TV (4) on HDTV using a simple workflow. "We were going on skiing holiday and my wife wanted to watch the movie "The Hunger Games: Catching Fire" whilst we are away. I had a bluray only copy (no digital or DVD) so was looking for a way to digitize Blu-ray for playback on HDTV though Apple TV. Any suggestion?"  Most people's first thought upon playing The Hunger Games Blu-ray on Apple TV 4/3/2/1 is to stream/AirPlay/mirror Blu-ray to Apple TV 4 from PC or Mac, which however has some limits and will be explained later. Some say use VLC media player, which should works but I have never tried it myself. In fact, to play The Hunger Games Blu-ray on Apple TV, you should keep a few things in mind: As the newly released commercial Blu-ray disc, The Hunger Games 2 Blu-ray discs are protected with region codes and layers of digital rights management, including AACS, and BD+, etc. A common Blu-ray player or drive can't read Blu-ray information. However, ATV does not include a drive for playing The Hunger Games Blu-ray. Apple TV supports MOV, MP4, and M4V in H.264 or MPEG-4 codec. As your Blu-ray isn't supported by Apple TV, the ultimate solution sseems to be to rip The Hunger Games Blu-ray to Apple TV (4), to some extent. At this point, we recommend Dimo Video Converter Ultimate, the best Blu-ray ripper for home and office use. OS: Windows 98, NT, 2000, 2003, Vista, Windows 7, Windows 8/8.1, Windows 10 Why choose Dimo to rip The Hunger Games Blu-ray to Apple TV? 1. Rip any Blu-ray disc with advanced disc decrypting technology and powerful copy protection removing ability. It can Decrypt Blu-ray discs with BD+ and the latest MKB protections and CSS-DVD discs. The 1080p video and DTS 5.1/7.1 audio systems are included to get a better audiovisual experience. With the "Media Server" function, users can also watch Blu-ray movies on HD TVvia Apple TV with Wi-Fi. 2. 100% quality lossless conversion of Blu-ray to Apple TV. Convert Blu-ray to Apple TV with full movie, main movie, preferred subtitle(s), etc. 3. 6X faster Bluray to ATV conversion with the help of NVIDIA CUDA, AMD APP and Intel Quick Sync graphics acceleration technologies. 4. All Apple TV tablets are available with preset specific profiles for easy and direct Blu-ray to Apple TV conversion so that you can rip Blu-ray to ATV videos for unlimited playback, be it Apple TV, Apple TV 2, Apple TV 3, Apple TV 4, etc. The equivalent Mac version is Dimo Video Converter Ultimate for Mac. Now, Just download, install and launch this great Blu-ray Ripper and then follow the tutorial to play The Hunger Games Blu-ray movie on Apple TV 4/3/2/1. Free Download Dimo Video Converter Ultimate (Win/Mac):
 Other Download:
How to convert and stream The Hunger Games Blu-ray to Apple TV NOTE: Anywhere from 30 to 60 GB of hard disk space is needed depending on what you're ripping. Blu-Rays are big, and we're going to rip the whole thing to our drive first, so depending on the movie you're ripping and the quality you want in your final movie file, you'll need a good amount of space. 1. Insert your The Hunger Games Blu-ray Blu-ray disc to the Blu-ray Disc drive, then launch The Hunger Games Blu-ray Blu-ray Ripper and click the "Add Blu-ray" button to have the blu-ray content imported.
Other Download:
How to convert and stream The Hunger Games Blu-ray to Apple TV NOTE: Anywhere from 30 to 60 GB of hard disk space is needed depending on what you're ripping. Blu-Rays are big, and we're going to rip the whole thing to our drive first, so depending on the movie you're ripping and the quality you want in your final movie file, you'll need a good amount of space. 1. Insert your The Hunger Games Blu-ray Blu-ray disc to the Blu-ray Disc drive, then launch The Hunger Games Blu-ray Blu-ray Ripper and click the "Add Blu-ray" button to have the blu-ray content imported.  Tip: Before start ripping Blu-ray to Apple TV videos, you can backup Blu-ray movies first in a lossless way or clone Blu-ray to ISO. 2. Click "Select Format" bar and choose any of the Apple TV, AppleTV2, AppleTV3, AppleTV4 from "Device > Apple" as the output file format. If you want to add Blu-ray to Apple TV for playing on Samsung TV, LG TV, Sony TV, Panasonic TV, etc., you can also directly select a format from decent device preset under "TVS". (Check TV supported format first) 3. Click the "Settings" icon, and you can adjust codec, bit rate, frame rate, sample rate and audio channel in the interface according to your needs and optimize the output file quality.
 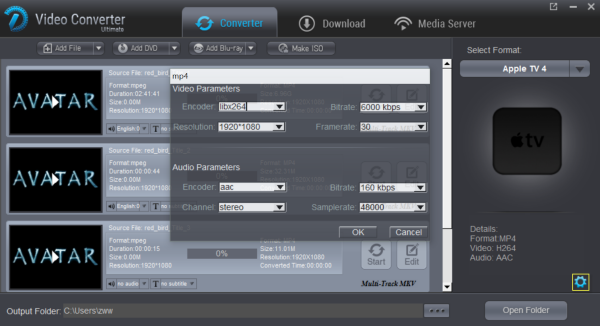 Note: By choosing this format, you will get two sound tracks in the result MP4 video, one is stereo, and the other is AC3 encoded Dolby Digital 5.1 pass-through by setting channels to 6. When your Apple TV is connected to audio receiver, the 5.1 surround sound will work. When ATV is connected to your HDTV only, the stereo track will work. Since ATV 4 supports Dolby Digital 7.1 while Apple TV 3 supports 5.1, you can also rip Blu-ray to multi-track MP4 for ATV 4. Or if you want to compress The Hunger Games Blu-ray to a video more suitable for watching, you can down scale the video size and video bitrae. 4. Press the big "Start" button at the bottom of the main interface to convert Blu-ray to MP4 for Apple TV. You've made it. This professional Blu-ray to Apple TV Converter really never lets you down during the work. After the conversion, get the outputs to add to your iTunes library or sync to Apple TV for playback at ease. Just enjoy. For mac users, here are ways for streaming to ATV on Mac: 1. AirPlay Blu-ray to Apple TV 4 Step 1. Open iTunes and add the ripped Blu-ray video to iTunes by File -> Add file to library Step 2. Connect your Mac and Apple TV to the same Wi-Fi. Step 3. Click AirPlay icon (besides volume slider) and select Apple TV to enable the Blu-ray to Apple TV streaming. Step 4. And then you can watch The Hunger Games Blu-ray on Apple TV 4/3/2/1. Note: Blu-ray video to Apple TV 4 AirPlay requires iTunes 10.1 and superior, OS X Mountain Lion and later. Despite the fact it has HDMI 1.4 UHD video output on the back, Apple TV 4 does not allow 4K video streaming or AirPlay. For AirPlay 4K Blu-ray video to Apple TV 4 on both Mac and Windows, rip or compress them at first. Mirror Blu-ray to Apple TV 4 Step 1. Play Blu-ray on Mac using an external Blu-ray drive (if needed) and 3rd-party Blu-ray player. * Blu-rays played back with default Apple players cannot be mirrored Step 2. Open "Settings" on Apple TV to turn on AirPlay. Connect Mac and Apple TV to the same Wi-Fi. Step 3. Check "AirPlay Display" settings in system preference on Mac. Make sure it is enabled. Step 4. Click AirPlay button and select Apple TV. Step 5. Tap the AirPlay button again and choose "Mirror Built-in Display". Then you will be able to watch The Hunger Games Blu-ray Blu-ray videos on Apple TV/4. AirPlay and Mirror of course are impressive video streaming technologies for downloaded and locally stored movie files. But is Mirror the best way for playing Blu-ray on Apple TV 4? Well, it depends. It may take you a while to realize that most Blu-rays cannot be played on Apple TV 4 via mirroring, due to copyright issues, making Blu-ray rip to Apple TV a necessary step. Free Download or Purchase Dimo Video Converter Ultimate:
 Need the lifetime version to work on 2-4 PCs so that your friends and family can instantly broaden their entertainment options? Please refer to the family license here.
  Kindly Note: The price of Dimo Video Converter Ultimate for Windows is divided into 1 Year Subscription, Lifetime/Family/Business License: $43.95/Year; $45.95/lifetime license; $95.95/family license(2-4 PCs); $189.95/business pack(5-8 PCs). Get your needed one at purchase page. Contact us or leave a message at Facebook if you have any issues. Related Articles:
Source: Work PIX-E5 4K ProRes files with Avid Media Composer on Mac
Kindly Note: The price of Dimo Video Converter Ultimate for Windows is divided into 1 Year Subscription, Lifetime/Family/Business License: $43.95/Year; $45.95/lifetime license; $95.95/family license(2-4 PCs); $189.95/business pack(5-8 PCs). Get your needed one at purchase page. Contact us or leave a message at Facebook if you have any issues. Related Articles:
Source: Work PIX-E5 4K ProRes files with Avid Media Composer on Mac
Have created DVD content using DVD authoring software? The result will be a Video_ts DVD folder which contains all data for the DVD movies including VIDEO_TS.IFO, VIDEO_TS.BUP, and VIDEO_TS.VOB. In general, you cannot play Video_TS files on Window PC directly without a DVD player. Get frustrated? Don't worry. This article will guide you on how to play the Video_TS files on your Windows (10) smoothly. 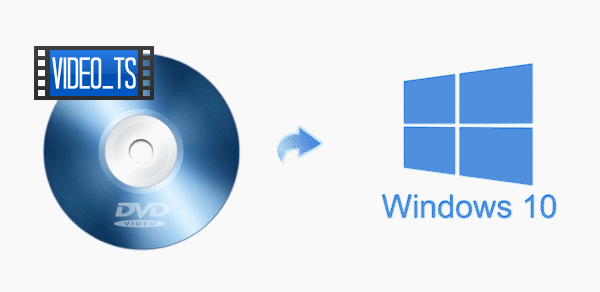 If you need to enjoy Video_TS folder on Windows 10. Here are two ways for your reference. 1) Use Video_TS Player: There are many DVD players that enables to play DVD Video_TS folder on Windows and Mac easily. You can try KMPlayer, VLC, Windows Media Player or so. Here takes VLC as an example: You can easily playback your VIDEO_TS files if you have a VIDEO_TS player installed. VideoLAN (VLC Player) will be one of your alternatives. Download this player and follow the below steps to player your VIDEO_TS files. 1. To play a copied/ripped DVD(VIDEO_TS files) from hard disk you can use VideoLAN (VLC Player). 2. Install it. Start VideoLAN (click Start -> Programs -> VideoLAN -> VLC Media Player) 3. Click File -> Open Directory. Find the VIDEO_TS folder, select it and click OK. 2) Convert Video_TS to Windows 10 Supported Format: Besides utilizing media player to solve the Video_TS playback problem, you can also count on a DVD Ripper that can convert Video_TS to MP4 or other format playable on VLC, Windows media player and even all popular multimedia devices like iPad, iPhone, Surface, Nokia, BlackBerry, TV, Xbox 360/One/One S, PS3/PS4, PS Vita, WD TV, Popcorn Hour and more. To change the format from DVD Video_TS on Windows 10, Dimo Video Converter Ultiamte fits the bill, which makes perfect-quality backup of all your DVDs, ISO images and DVD Video_TS folders using on your computer hard drive and convert entire Video_TS to MP4 single file or other mainstream formats like Video_TS to MKV, AVI, WMV, MOV, VOB, etc at 30X faster. Standing out from the rivals in the market doesn't merely lies in its DVD backup performance, it out-performs other Video_TS converters with intuitive interface, a wide range of supported multimedia file types, a massive set of profiles ready for phones and tablets, the unique DVD copy protection bypass trait and other awesome features as below: a. Superior to Handbrake rip DVD or so, it gets rid of DVD/Video_TS folder copy protection measures of the new releases on DVD, be it CSS, Region Code, Sony ARccOS or Disney X-project DRM. b. It eclipses Mac The Ripper which only backup encrypted DVDs to hard drive by enabling to make wide range of compatibility. It supports to extract WMV, AVI, MKV, MP4 from Video_TS folder and DVD and enables to convert Video_TS, ISO Image and DVD to iPhone 7/7S, iPad Pro, Samsung Galaxy S7 Edge, Samsung TV, as many as 150+ mainstream devices. c. Besides encoding DVD Video_TS folder to MP4, AVI, MKV, and more, the DVD ripper is built in a video editor that lets you edit and touch up your movies, and choose your preferred language track and even add special effect to movie. Free Download Dimo Video Converter Ultimate (Win/Mac): Other Download:
Convert VIDEO_TS to MP4/WMV/MKV playing on Windows 10 1. Run the VIDEO_TS Converter and click "Add DVD" to import the VIDEO_TS files you want to convert. As you see, DVD disc, DVD folder are all well supported.
If you need to enjoy Video_TS folder on Windows 10. Here are two ways for your reference. 1) Use Video_TS Player: There are many DVD players that enables to play DVD Video_TS folder on Windows and Mac easily. You can try KMPlayer, VLC, Windows Media Player or so. Here takes VLC as an example: You can easily playback your VIDEO_TS files if you have a VIDEO_TS player installed. VideoLAN (VLC Player) will be one of your alternatives. Download this player and follow the below steps to player your VIDEO_TS files. 1. To play a copied/ripped DVD(VIDEO_TS files) from hard disk you can use VideoLAN (VLC Player). 2. Install it. Start VideoLAN (click Start -> Programs -> VideoLAN -> VLC Media Player) 3. Click File -> Open Directory. Find the VIDEO_TS folder, select it and click OK. 2) Convert Video_TS to Windows 10 Supported Format: Besides utilizing media player to solve the Video_TS playback problem, you can also count on a DVD Ripper that can convert Video_TS to MP4 or other format playable on VLC, Windows media player and even all popular multimedia devices like iPad, iPhone, Surface, Nokia, BlackBerry, TV, Xbox 360/One/One S, PS3/PS4, PS Vita, WD TV, Popcorn Hour and more. To change the format from DVD Video_TS on Windows 10, Dimo Video Converter Ultiamte fits the bill, which makes perfect-quality backup of all your DVDs, ISO images and DVD Video_TS folders using on your computer hard drive and convert entire Video_TS to MP4 single file or other mainstream formats like Video_TS to MKV, AVI, WMV, MOV, VOB, etc at 30X faster. Standing out from the rivals in the market doesn't merely lies in its DVD backup performance, it out-performs other Video_TS converters with intuitive interface, a wide range of supported multimedia file types, a massive set of profiles ready for phones and tablets, the unique DVD copy protection bypass trait and other awesome features as below: a. Superior to Handbrake rip DVD or so, it gets rid of DVD/Video_TS folder copy protection measures of the new releases on DVD, be it CSS, Region Code, Sony ARccOS or Disney X-project DRM. b. It eclipses Mac The Ripper which only backup encrypted DVDs to hard drive by enabling to make wide range of compatibility. It supports to extract WMV, AVI, MKV, MP4 from Video_TS folder and DVD and enables to convert Video_TS, ISO Image and DVD to iPhone 7/7S, iPad Pro, Samsung Galaxy S7 Edge, Samsung TV, as many as 150+ mainstream devices. c. Besides encoding DVD Video_TS folder to MP4, AVI, MKV, and more, the DVD ripper is built in a video editor that lets you edit and touch up your movies, and choose your preferred language track and even add special effect to movie. Free Download Dimo Video Converter Ultimate (Win/Mac): Other Download:
Convert VIDEO_TS to MP4/WMV/MKV playing on Windows 10 1. Run the VIDEO_TS Converter and click "Add DVD" to import the VIDEO_TS files you want to convert. As you see, DVD disc, DVD folder are all well supported. 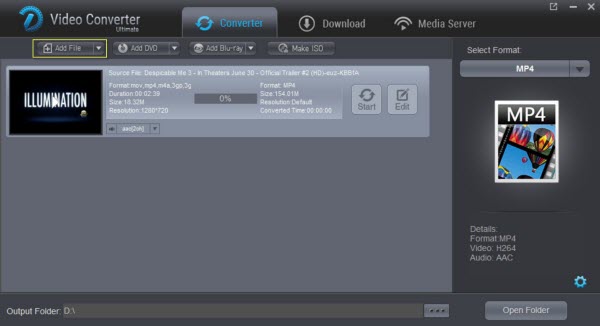 2. As for playing VIDEO_TS in VLC on Windows 10, the MP4, WMV, MKV file type is recommended. You can click the "Select Format" bar and choose these format from "Format > Video" list. Tip: If the default the video, audio settings are not to your demand, you can click the Settings icon to adjust them including video codec, bitrate, frame rate, audio codec, sample rate…
 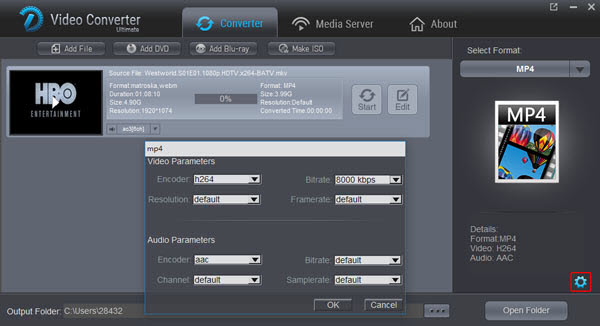 3. Hit the "Start" button to convert VIDEO_TS files on Windows 10. After the conversion, you can open and play your VIDEO_TS folder from Windows 10 on iPad, iPhone, Android, TV, VR headsets, etc. smoothly with the best quality. Tip: What's Vidoe_TS folder? Video_TS folder contains three kinds of formats, IFO, BUP and VOB. VIDEO_TS.VOB: VOB is the main part of the data present in DVD, packaging video, audio data, subtitles and other information. VIDEO_TS.IFO: The file stores control and playback information for the entire DVD, e.g information about subtitles, audio tracks, number of volumes, table of titles, etc. VIDEO_TS.BUP: It is the backup copy of Video_TS.IFO file, part of Video Manager. IFO is information file, which is the main factor to operate video playback. With IFO files you can forward or backward the video at will. If IFO files are damaged or can’t be read, don’t worry. BUP is the backup of IFO and they have the totally same function. But if you happen to lose them all, you will have big trouble in controlling video play, so be careful. VOB means video objects, which is the container of video files. No need to say how important it is. Free Download or Purchase Dimo Video Converter Ultimate: Need the lifetime version to work on 2-4 PCs so that your friends and family can instantly broaden their entertainment options? Please refer to the family license here. Kindly Note: The price of Dimo Video Converter Ultimate for Windows is divided into 1 Year Subscription, Lifetime/Family/Business License: $43.95/Year; $45.95/lifetime license; $95.95/family license(2-4 PCs); $189.95/business pack(5-8 PCs). Get your needed one at purchase page. Contact us or leave a message at Facebook if you have any issues. Related Articles:
Source: How to Watch DVD on Galaxy Tab S2
3. Hit the "Start" button to convert VIDEO_TS files on Windows 10. After the conversion, you can open and play your VIDEO_TS folder from Windows 10 on iPad, iPhone, Android, TV, VR headsets, etc. smoothly with the best quality. Tip: What's Vidoe_TS folder? Video_TS folder contains three kinds of formats, IFO, BUP and VOB. VIDEO_TS.VOB: VOB is the main part of the data present in DVD, packaging video, audio data, subtitles and other information. VIDEO_TS.IFO: The file stores control and playback information for the entire DVD, e.g information about subtitles, audio tracks, number of volumes, table of titles, etc. VIDEO_TS.BUP: It is the backup copy of Video_TS.IFO file, part of Video Manager. IFO is information file, which is the main factor to operate video playback. With IFO files you can forward or backward the video at will. If IFO files are damaged or can’t be read, don’t worry. BUP is the backup of IFO and they have the totally same function. But if you happen to lose them all, you will have big trouble in controlling video play, so be careful. VOB means video objects, which is the container of video files. No need to say how important it is. Free Download or Purchase Dimo Video Converter Ultimate: Need the lifetime version to work on 2-4 PCs so that your friends and family can instantly broaden their entertainment options? Please refer to the family license here. Kindly Note: The price of Dimo Video Converter Ultimate for Windows is divided into 1 Year Subscription, Lifetime/Family/Business License: $43.95/Year; $45.95/lifetime license; $95.95/family license(2-4 PCs); $189.95/business pack(5-8 PCs). Get your needed one at purchase page. Contact us or leave a message at Facebook if you have any issues. Related Articles:
Source: How to Watch DVD on Galaxy Tab S2
As 4K-resolution cameras falling into consumers' hands, such as BlackMagic Design Production Camera, Leica D-LUX, Panasonic LUMIX DMC-GH4K/FZ1000, Sony Alpha a7S, GoPro Hero4 Black, Canon EOS 1D-C, etc. In this situation, if you recorded some 4K videos with your 4K camcorder, you may prefer to edit them before sharing with friends or uploading to YouTube or 4K TV. Then the question arises. Will editing programs like Premiere Pro CC support 4K videos?  Granted, Premiere Pro CC 7 (2017 included), CS6 can handle (usually) 4K files without much problem, but it is extremely hardware intensive. You probably don't like to invest a new computer, that means dead end? Humh, of course not, but you do need to transcode 4K video to Premiere Pro using MPEG-2 (1080p) as primary delivery format. Here we will discuss how to edit 4K footage with Premiere Pro without bogging down your computer. How to import and edit 4K video in Premerie Pro CC successfully? To get a best solution for 4K video and finish the 4K video conversion task, the best Mac 4K video converter app, Dimo Video Converter Ultimate for Mac, is your best choice to transcode DJI, Nikon, Sony, Blackmagic, GoPro, Panasonic, Canon 4K video to Premerie Pro CC codec. With it, you can effortlessly transcode transcode 4K video, H.264(MP4), XAVC, XAVC S, etc footage to MPEG-2 for Premiere Pro. What's more, it supports converting 4K files to various non-linear editing systems (NLE), including Avid Media Composer, Final Cut Pro, Camtasia Studio and more. If you work 4K files in Adobe Premiere Pro on Windows PC, please get Dimo Video Converter Ultimate to solve the issues. Free Download Dimo Video Converter Ultimate for Mac/Win:
 Other Download:
Convert 4K video files for Adobe Premiere Pro CS6/CC/CS6/CS5/CS4 Step 1. Load 4K Files Run the program you just install, and drag and drop the 4K video files to the 4K converter. You can also hit "Add File" button to import videos to the app. Step 2. Choose output format Click "Select Format" bar and choose "Format" > "Editor" > "Adobe Premiere" as output format for editing 4K in Adobe with natively supported video codec.
Other Download:
Convert 4K video files for Adobe Premiere Pro CS6/CC/CS6/CS5/CS4 Step 1. Load 4K Files Run the program you just install, and drag and drop the 4K video files to the 4K converter. You can also hit "Add File" button to import videos to the app. Step 2. Choose output format Click "Select Format" bar and choose "Format" > "Editor" > "Adobe Premiere" as output format for editing 4K in Adobe with natively supported video codec.  Tips: Click "Setting" button if you'd like to customize advanced audio and video parameters like Video Codec, aspect ratio, bit rate, frame rate, Audio codec, sample rate, audio channels. However, please keep it default as original if you want to get original 4K resolution. Step 3. Start converting 4K files Tab the "Start" button of this fastest 4K Video Converter. It will start to transcode 4K for importing to Adobe Premiere Pro immediately. Soon after the conversion, just click "Open" button to get the generated files for natively editing in Premiere Pro CC 2017 as well as CC7/CS6/CS5/CS4/CS3 perfectly. Other tips to get best Premiere Pro CC Settings: 1. Disable High-Quality Playback, gets you apx. 5-10% performance (Player Window/Wrench Icon/High Qaulity Playback). INFO: Mercury Engine Transmit to second monitor, takes away apx. 5-10% performance (Player Window/Wrench Icon/Enable Transmit). 2. RedCode/Cineform movie files: Set playback resolution to 1/2 or 1/4 size will increase performace apx. 10-20% (Player Window/Full-1/2-1/4,etc.) 3. Increase Playback Preroll and Postroll time to 3-8 seconds for smoother playback, especially with slower harddrives (Edit/Preferences/Playback/Preroll-Postroll). 4. Disable Lumetri Scopes if not needed. They have been optimized in PP 2015.3 but you loose 3-8% performance when enabled (Window/Lumetri Scopes). Free Download or Purchase Dimo Video Converter Ultimate for Mac:
 Contact us or leave a message at Facebook if you have any issues of importing 4K to Premiere Pro CC. More Articles:
Source:Is it possible to watch 3D movies on PC using VLC media player?
Contact us or leave a message at Facebook if you have any issues of importing 4K to Premiere Pro CC. More Articles:
Source:Is it possible to watch 3D movies on PC using VLC media player?
While looking to edit some MKV movies (ripped with MakeMKV, download from online or from other source), the only problem is that NLE like Adobe Premiere Pro won't import MKV files directly, and you may come across lots of problems, such as nothing shows up on the screen, or there is only image or you only get sound in Premiere Pro. If you're having trouble editing MKV files in Premiere Pro CC (2017), CS6, CS5, etc., just read on for details.  Actually, Adobe Premiere Pro supported video formats do not include MKV format. So what's the best way to resolve the MKV and PPro incompatibility issue? Well, as we've found out yet, the easy workaround is to transcode MKV to a more editing-friendly format, such a Premiere Pro's MOV or MPEG-2 codec. with Dimo Video Converter Ultimate for Mac. It's an optimal MKV converter that helps you decode MKV files when converting into a different, and ideally more edit friendly format for Premiere Pro. So you can edit MKV footage with Premiere Pro CC/CS6/CS5 without any issue. Beside, this video convert program can also help to convert MKV to Avid Media Composer, Final Cut Pro, iMovie, FCE, etc. Plus, with the built-in video editing feature of the program, you can trim, crop, add watermark, set effect and more to your video files so as to bring you a wonderful home movie as you want. If you want to transcode MKV to Premiere Pro on Windows, please turn to Dimo Video Converter Ultimate. Now download the software and follow the steps to re-encode .mkv to Premiere Pro for editing. Free Download Dimo Video Converter Ultimate for Mac/Win: Other Download:
How to Successfully Import MKV into Premiere Pro CC/CS6/CS5 Step 1: Import MKV files Run MKV to Premiere Converter for Mac and load source MKV clips to it. You can import MKV clips to the program through "Add File" button. You can also directly drag the video files into the program directly. Not only MKV file, but also MP4, AVI, VOB, WMV, FLV, etc are supported. Batch conversion is supported by the latest 3.0.0 version, so you can load more than one file to save time.
Actually, Adobe Premiere Pro supported video formats do not include MKV format. So what's the best way to resolve the MKV and PPro incompatibility issue? Well, as we've found out yet, the easy workaround is to transcode MKV to a more editing-friendly format, such a Premiere Pro's MOV or MPEG-2 codec. with Dimo Video Converter Ultimate for Mac. It's an optimal MKV converter that helps you decode MKV files when converting into a different, and ideally more edit friendly format for Premiere Pro. So you can edit MKV footage with Premiere Pro CC/CS6/CS5 without any issue. Beside, this video convert program can also help to convert MKV to Avid Media Composer, Final Cut Pro, iMovie, FCE, etc. Plus, with the built-in video editing feature of the program, you can trim, crop, add watermark, set effect and more to your video files so as to bring you a wonderful home movie as you want. If you want to transcode MKV to Premiere Pro on Windows, please turn to Dimo Video Converter Ultimate. Now download the software and follow the steps to re-encode .mkv to Premiere Pro for editing. Free Download Dimo Video Converter Ultimate for Mac/Win: Other Download:
How to Successfully Import MKV into Premiere Pro CC/CS6/CS5 Step 1: Import MKV files Run MKV to Premiere Converter for Mac and load source MKV clips to it. You can import MKV clips to the program through "Add File" button. You can also directly drag the video files into the program directly. Not only MKV file, but also MP4, AVI, VOB, WMV, FLV, etc are supported. Batch conversion is supported by the latest 3.0.0 version, so you can load more than one file to save time.  Step 2: Choose Premiere Pro preferred format Click "Select Format" pull down list to select "Editor > Adobe Premiere" as the best video format for Premiere Pro. WMV, MPEG-2 formats from "Format > Video" are the good choice as well. Tip -Profile Settings: In case the default settings do not fit your requirement, you can click "Settings" button and enter "Profile Settings" panel to adjust video size, bit rate, frame rate, sample rate and audio channels.
 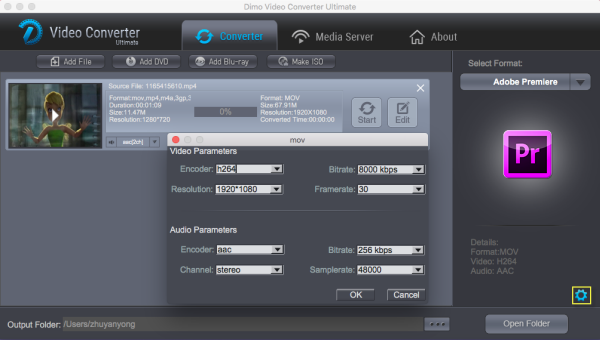 Step 3: Start conversion Click "Start" button to start convert MKV for importing to Premiere Pro CC/CS6/CS5. When the conversion task is finished, click "Open" button to get the exported files. Step 4: Import converted MKV files into Premiere Pro You're now ready to get the result files into Adobe Premiere Pro to do further editing. Launch Premiere Pro on your Mac, choose "File > Import" to import any file. If you prefer to use keyboard shortcuts, press Command+I to open the standard Import dialog. Free Download or Purchase Dimo Video Converter Ultimate for Mac/Win:
 Need the lifetime version to work on 2-4 Macs so that your friends and family can instantly broaden their entertainment options? Please refer to the family license here. Kindly Note: The price of Dimo Video Converter Ultimate for Mac is divided into 1 Year Subscription, Lifetime/Family/Business License: $43.95/Year; $45.95/lifetime license; $95.95/family license(2-4 Macs); $189.95/business pack(5-8 Macs). Get your needed one at purchase page. Related Software: BDmate (Mac/Win) Lossless backup Blu-ray to MKV with all audio and subtitle tracks; Rip Blu-ray to multi-track MP4; Convert Blu-ray to almost all popular video/audio formats and devices; Copy Blu-ray to ISO/M2TS; Share digitized Blu-ray wirelessly. DVDmate (Mac/Win) A professional DVD ripping and editing tool with strong ability to remove DVD protection, transcode DVD to any video and audio format, and edit DVD to create personal movie. Videomate (Mac/Win) An all-around video converter software program that enables you to convert various video and audio files to formats that are supported by most multimedia devices. 8K Player (Mac/Win) A mixture of free HD/4K video player, music player, Blu-ray/DVD player, video recorder and gif maker. Contact us or leave a message at Facebook if you have any issues. Related Articles:
Source: Easiest Way to Import Blu-ray to iTunes for Your iPhone, iPod, iPad
Need the lifetime version to work on 2-4 Macs so that your friends and family can instantly broaden their entertainment options? Please refer to the family license here. Kindly Note: The price of Dimo Video Converter Ultimate for Mac is divided into 1 Year Subscription, Lifetime/Family/Business License: $43.95/Year; $45.95/lifetime license; $95.95/family license(2-4 Macs); $189.95/business pack(5-8 Macs). Get your needed one at purchase page. Related Software: BDmate (Mac/Win) Lossless backup Blu-ray to MKV with all audio and subtitle tracks; Rip Blu-ray to multi-track MP4; Convert Blu-ray to almost all popular video/audio formats and devices; Copy Blu-ray to ISO/M2TS; Share digitized Blu-ray wirelessly. DVDmate (Mac/Win) A professional DVD ripping and editing tool with strong ability to remove DVD protection, transcode DVD to any video and audio format, and edit DVD to create personal movie. Videomate (Mac/Win) An all-around video converter software program that enables you to convert various video and audio files to formats that are supported by most multimedia devices. 8K Player (Mac/Win) A mixture of free HD/4K video player, music player, Blu-ray/DVD player, video recorder and gif maker. Contact us or leave a message at Facebook if you have any issues. Related Articles:
Source: Easiest Way to Import Blu-ray to iTunes for Your iPhone, iPod, iPad